Few dishes carry as much comfort and celebration as chicken biryani. This layered rice and meat dish, cherished across the Indian subcontinent, has countless regional variations — Hyderabadi, Sindhi, Kolkata, Lucknowi, and more — but nearly all of them share a common soul: tender, spiced chicken, fragrant basmati rice, and a slow, steam-sealed finish known as “dum” cooking. If you’ve ever hesitated to try biryani at home because the steps felt intimidating, this guide breaks everything down so you can make a restaurant-style chicken biryani in your own kitchen with confidence.
What Makes a Great Chicken Biryani?
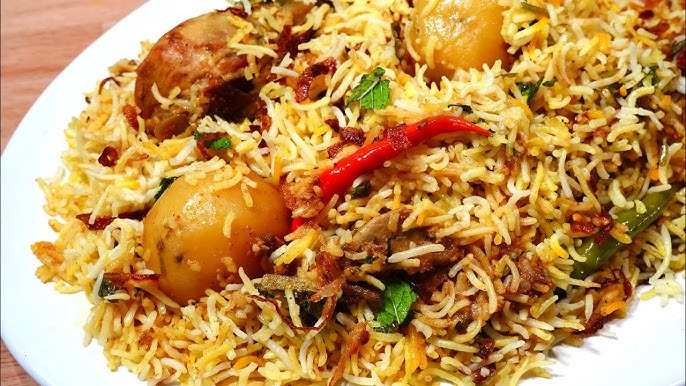
At its core, biryani is a spiced rice dish layered with meat, and the magic lies in three things: a well-marinated chicken, perfectly par-cooked basmati rice, and a gentle dum finish that lets the flavors meld together. The best versions use whole spices like cardamom, cinnamon, cloves, bay leaf, and shahi jeera for the flavor base, along with ground spices such as turmeric, red chili powder, and garam masala. Fresh mint and coriander leaves, crispy fried onions, and a touch of saffron milk bring freshness, texture, and that signature golden color to the finished dish.
Ingredients You’ll Need
For the Chicken Marinade
- 1 kg chicken (bone-in pieces like thighs, drumsticks, or a mix, for maximum flavor)
- 1 cup thick yogurt
- 1 tablespoon ginger-garlic paste
- 1–2 green chilies, slit
- 1 teaspoon turmeric powder
- 1–2 teaspoons Kashmiri red chili powder (milder, with great color)
- 1 teaspoon garam masala
- 1 tablespoon lemon juice
- 2 tablespoons chopped mint leaves
- 2 tablespoons chopped coriander (cilantro) leaves
- Salt to taste
For the Rice
- 2 cups premium aged basmati rice, rinsed and soaked 30–40 minutes
- 4 green cardamoms
- 4 cloves
- 1 black cardamom
- 2-inch cinnamon stick
- 1 bay leaf
- 1 star anise (optional)
- 1 teaspoon shahi jeera or regular cumin seeds
- Salt, to season the boiling water generously
For Layering and Assembly
- 3–4 medium onions, thinly sliced and fried until golden and crisp
- A pinch of saffron strands soaked in 2–3 tablespoons of warm milk
- 2 tablespoons ghee or oil
- Extra chopped mint and coriander leaves
- Optional: rose water or kewra water for aroma
Step 1: Marinate the Chicken
In a large bowl, whisk together the yogurt, ginger-garlic paste, turmeric, red chili powder, garam masala, lemon juice, and salt until smooth. Add the chicken pieces along with the chopped mint and coriander, and mix thoroughly so every piece is well coated. Cover and refrigerate for at least 2 hours, though marinating overnight gives noticeably deeper flavor and more tender meat. This step is one of the most important in the entire process, since the yogurt-based marinade tenderizes the chicken while the spices infuse it from the inside out.
Step 2: Fry the Onions
While the chicken marinates, heat oil in a pan and fry the sliced onions in batches over medium heat, stirring frequently, until they turn a deep golden brown and crisp. Remove with a slotted spoon and drain on paper towels. These crispy fried onions, often called “birista,” are a defining texture in biryani — they add sweetness, crunch, and a rich caramelized flavor to every layer. You can fry extra and store them for later use.
Step 3: Par-Cook the Basmati Rice
Bring a large pot of water to a rolling boil and season it generously with salt, along with the whole spices — cardamom, cloves, cinnamon, bay leaf, and shahi jeera. Drain the soaked basmati rice and add it to the boiling water. Cook until the rice is about 70–80% done, meaning the grains are still slightly firm at the core. This usually takes 5–7 minutes depending on the rice variety. Drain immediately to stop the cooking process; overcooked rice at this stage will turn mushy during the dum step.
Step 4: Cook the Marinated Chicken
Heat a heavy-bottomed pot or Dutch oven with a little oil or ghee. Add the marinated chicken along with its marinade and cook on medium heat, stirring occasionally, until the chicken is about halfway cooked and the masala has thickened slightly around the pieces. This partial cooking ensures the chicken finishes perfectly during the dum stage without becoming dry or overcooked.
Step 5: Layer the Biryani
This is where the dish comes together. Spread the partially cooked chicken and its masala evenly across the bottom of the pot. Layer half of the par-cooked rice on top, followed by a sprinkling of fried onions, chopped mint, coriander, and a drizzle of saffron milk. Add the remaining rice as the final layer, and top it with the rest of the fried onions, herbs, and saffron milk. A final drizzle of ghee adds richness and helps keep the top layer of rice fluffy rather than dry.
Step 6: Dum Cooking — The Slow Steam Finish
Seal the pot tightly. Traditionally, a dough seal is pressed around the rim of the lid to trap every bit of steam inside, though a tight-fitting lid or a layer of aluminum foil works well for home cooking too. Place the pot on a heated griddle or tawa if you have one, as this helps distribute heat evenly and prevents the bottom from scorching. Cook on low heat for 20–25 minutes. During this time, the residual steam finishes cooking the chicken and rice together, allowing all the layered flavors, spices, and aromas to meld into one another.
Step 7: Rest, Fluff, and Serve
Once the dum cooking is complete, turn off the heat and let the biryani rest, still covered, for 5–10 minutes. This resting period allows the rice grains to set and makes fluffing much easier. Remove the lid and gently fluff the biryani with a fork, working from the sides toward the center so you mix the layers without breaking the delicate rice grains or overmixing the chicken.
Serve hot, garnished with extra fried onions and fresh coriander, alongside raita (a cooling yogurt-based side), a simple salad, or roti. The contrast between the cool, tangy raita and the warm, spiced biryani is part of what makes this dish so satisfying.
Tips for the Best Chicken Biryani
- Use aged basmati rice. Older rice has less moisture and holds its shape better, giving you long, separate grains instead of a sticky mass.
- Don’t skip the resting time. Letting the biryani sit after cooking, both before and after fluffing, makes a real difference to texture.
- Bone-in chicken adds more flavor than boneless, though boneless pieces cook faster if you’re short on time.
- Make your own garam masala if possible. Freshly ground spices are noticeably more aromatic than store-bought blends that have been sitting on a shelf.
- Don’t overmix while fluffing. Biryani should have distinct layers and whole rice grains, not a uniform, mashed texture.
- Adjust spice levels with the quantity of red chili powder and green chilies to suit your preference, without losing the core flavor profile.
Common Variations
Biryani styles vary widely by region and household. Hyderabadi biryani, the most widely recognized version internationally, uses a rich, well-spiced marinade and a classic dum finish. Some households prefer adding boiled potatoes or eggs to the layers for extra heartiness. Others adjust the balance of whole versus ground spices, or add a touch of rose water and kewra water for a more fragrant, celebratory version often served at weddings and special occasions. Whichever style you choose, the fundamental technique — marinate, par-cook, layer, and steam — stays largely the same.
Final Thoughts
Chicken biryani might seem like an intimidating dish at first glance, given its long ingredient list and multiple steps, but once you understand the logic behind each stage — marinating for flavor, par-cooking the rice for texture, and dum cooking for that final melding of aromas — it becomes far more approachable. With a little practice, you’ll be able to recreate a restaurant-quality, aromatic, and deeply flavorful chicken biryani right in your own kitchen, perfect for family dinners, gatherings, or any occasion that calls for something special.
Leave a Reply